Completed Beta: Room Correction for Android

Beta testing concluded and stable version released to the public builds.
What I don't understand is how to apply this to the auto-EQ, after it has been generated. What does the first line
Code:
*1000Hz -36.6
mean?
Let's start with the first line. It obviously provides a sensitivity or gain number at 1 kHz, but it's not clear which software would be using that in what way. Read on if you're interested.

In general a calibration file might serve two more of less distinct purposes: Calibration for the right absolute level and counteracting the microphone's non-linear response.

First (and in most instances foremost) it provides relative correction for the microphones frequency response not being ruler flat and linear over frequency. Even if the sound pressure you want to measure has exactly the same level for all frequencies from 20 Hz to 20 kHz, the mic will capture different SP levels depending on the frequency. The calibration file represents the knowledge about these inaccuracies of the microphone and tells the measuring software what correction must be applied, so a "flat" input signal generates a "flat" output signal.

For some types of measurements we not only need to make sure that all frequencies measure the same, we also need the absolute SPL reading to be exact. Think e.g. impact sound insulation in buildings or the police checking if your car's after market exhaust is legal or not. :D This requires the knowledge of the absolute sensitivity (or required gain) for the microphone.

Dayton Audio create all their calibration files so that the amount of correction at 1 kHz is 0 dB. The relative correction is always in comparison to what SPL the microphone measures at 1 kHz. If the output is 2 dB louder at 200 Hz than it is at 1 kHz, then the calibration file will contain the value -2 dB. If the output is 1.5 dB lower at 55 Hz, then the calibration file will contain the value +1.5 dB for this frequency. The first line in the calibration file - will be ignored at least by the two most commonly used programs (HouseCurve app on iOS and REW on Linux, MacOS and Windows). It's not important for relative measurements anyway, so not too much to worry about.

And how shall I read the table? When it is minus dB, then I need to add this_value plus dB to the result and vice versa (subtract the positive)?
As mentioned above, if your calibration file shows e.g. 2.6 dB at 40 Hz (which means +2.6 dB) then the mic's reading is 2.6 dB too low during the measurement (with no calibration applied). The true SPL would be 2.6 dB higher than captured by the microphone.
=> If RC calculated a PEQ filter of +4 dB at 40 Hz, it really just had to be +1.4 dB to make up for the microphone's error, because the true SPL is just 1.4 dB lower than desired. Applying a full 4 dB would be overcompensating.
=>If RC had calculated a PEQ filter of -6.4 dB at 40 Hz, it really had to be -9 dB.

So, you would always subtract the value from the calibration file from the value calculated for the PEQ. However, there's a catch ... or two.

And are only the frequencies off, that show a result and those without a value are ok?
The calibration file contains just 256 data points. Everything in between two data points is strictly speaking unnkown, but it's likely in the same ballpark as the surrounding values. The first catch obviously is that you will not necessarily find the exact frequency of your PEQ filter in the calibration file. You will have to do some interpolation.

The second catch is that the caluculated PEQ values including gain and Q, not just the frequency, might have been somewhat different if a better microphone had been used (or if the WiiM Home App could make use of the calibration file). This is not much of an issue with small deviations in +/- 0.5 dB range. But espacially around frequencies with higher deviation from the ideal the manual correction might not give exactly the same values as a proper measurement with a better quality microphone.

In your case the calibration file looks so good from 20 Hz to 4 kHz, I wouldn't bother with any manual correction.
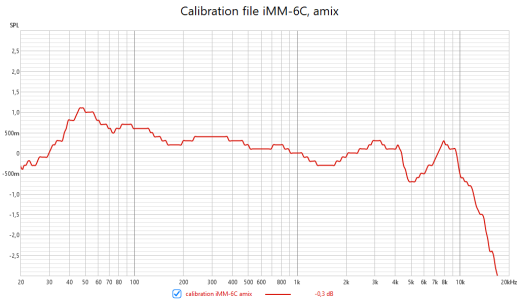
iMM6-C cal amix.png
If you feel like you're not completey happy with the 40 - 70 Hz range after performing the RC run adjust it to your liking, not according to the cal file.
 
Last edited:
Let's start with the first line. It obviously provides a sensitivity or gain number at 1 kHz, but it's not clear which software would be using that in what way. Read on if you're interested.

In general a calibration file might serve two more of less distinct purposes: Calibration for the right absolute level and counteracting the microphone's non-linear response.

First (and in most instances foremost) it provides relative correction for the microphones frequency response not being ruler flat and linear over frequency. Even if the sound pressure you want to measure has exactly the same level for all frequencies from 20 Hz to 20 kHz, the mic will capture different SP levels depending on the frequency. The calibration file represents the knowledge about these inaccuracies of the microphone and tells the measuring software what correction must be applied, so a "flat" input signal generates a "flat" output signal.

For some types of measurements we not only need to make sure that all frequencies measure the same, we also need the absolute SPL reading to be exact. Think e.g. impact sound insulation in buildings or the police checking if your car's after market exhaust is legal or not. :D This requires the knowledge of the absolute sensitivity (or required gain) for the microphone.

Dayton Audio create all their calibration files so that the amount of correction at 1 kHz is 0 dB. The relative correction is always in comparison to what SPL the microphone measures at 1 kHz. If the output is 2 dB louder at 200 Hz than it is at 1 kHz, then the calibration file will contain the value -2 dB. If the output is 1.5 dB lower at 55 Hz, then the calibration file will contain the value +1.5 dB for this frequency. The first line in the calibration file - will be ignored at least by the two most commonly used programs (HouseCurve app on iOS and REW on Linux, MacOS and Windows). It's not important for relative measurements anyway, so not too much to worry about.


As mentioned above, if your calibration file shows e.g. 2.6 dB at 40 Hz (which means +2.6 dB) then the mic's reading is 2.6 dB too low during the measurement (with no calibration applied). The true SPL would be 2.6 dB higher than captured by the microphone.
=> If RC calculated a PEQ filter of +4 dB at 40 Hz, it really just had to be +1.4 dB to make up for the microphone's error, because the true SPL is just 1.4 dB lower than desired. Applying a full 4 dB would be overcompensating.
=>If RC had calculated a PEQ filter of -6.4 dB at 40 Hz, it really had to be -9 dB.

So, you would always subtract the value from the calibration file from the value calculated for the PEQ. However, there's a catch ... or two.


The calibration file contains just 256 data points. Everything in between two data points is strictly speaking unnkown, but it's likely in the same ballpark as the surrounding values. The first catch obviously is that you will not necessarily find the exact frequency of your PEQ filter in the calibration file. You will have to do some interpolation.

The second catch is that the caluculated PEQ values including gain and Q, not just the frequency, might have been somewhat different if a better microphone had been used (or if the WiiM Home App could make use of the calibration file). This is not much of an issue with small deviations in +/- 0.5 dB range. But espacially around frequencies with higher deviation from the ideal the manual correction might not give exactly the same values as a proper measurement with a better quality microphone.

In your case the calibration file looks so good from 20 Hz to 4 kHz, I wouldn't bother with any manual correction.
View attachment 12650
If you feel like you're not completey happy with the 40 - 70 Hz range after performing the RC run adjust it to your liking, not according to the cal file.
Very informative! Thank you!
 
=> If RC calculated a PEQ filter of +4 dB at 40 Hz, it really just had to be +1.4 dB to make up for the microphone's error, because the true SPL is just 1.4 dB lower than desired. Applying a full 4 dB would be overcompensating.
=>If RC had calculated a PEQ filter of -6.4 dB at 40 Hz, it really had to be -9 dB.
Hi @harkpabst, very good information, thank you!

Though, I got problems with the math:
If RC calculated a PEQ filter of +4 dB at 40 Hz, where do you get the+ 1.4 dB from?
Count me disturbed.
 
Hi @harkpabst, very good information, thank you!

Though, I got problems with the math:
If RC calculated a PEQ filter of +4 dB at 40 Hz, where do you get the+ 1.4 dB from?
Count me disturbed.
I just made up that example to get nice looking numbers. I didn't use your actual microphone's calibration file, because it's "too good". :)

Your mic just needs a correction of 0.8 dB at 40 Hz. If RC calculated a PEQ filter of +4 dB at 40 Hz, then it would need to be corrected to +3.2 dB.

However, I wouldn't bother doing so with your mic and only make corrections if you don't like the RC results.
 
Last edited:
I know this is an Android thread, but to make things easier, maybe it's worth borrowing an iPhone for a while? I hope you won't judge what I'm writing badly. This is just a suggestion. You write a lot about Dayton here.
I wanted to wait for the microphone calibration files to be installed in the RC Wiim. I decided to buy the Housecurve app for the iPhone.
I don't know what app does the same on Android. If you know, please advise. If there is such an app, you can do the same on Android.
Housecurve supports calibration and my Dayton IMM-6C works well. Of course, I first took measurements without equalization. A fantastic function of Housecurve is an easy hint on how to set the equalization, what values to enter for frequency, gain and Q. All you have to do is copy them to the Wiim equalizer. After repeated measurements, the characteristic curve is much closer to the target curve than when using RC. There are much smaller deviations.
It also turned out that under the same conditions and settings, the results are different than the iPhone itself and the iPhone plus Dayton without calibration, used in the RC Wiim.
 
Last edited:
By the way, I have a question for Dayton microphone users. In some places I read that measuring microphones should be pointed upwards during measurement. How do you do it? Do you point them towards the speakers or upwards?
 
By the way, I have a question for Dayton microphone users. In some places I read that measuring microphones should be pointed upwards during measurement. How do you do it? Do you point them towards the speakers or upwards?
I have been pointing mine between the speakers. Maybe pointing upwards is more suitable for surround sound setups. As a test you could play tones at various frequencies in both orientations to see if the measured sound level changes. Or measure a sweep in both orientations.
 
Thanks for the tips.
I have made many measurements in many ways. I have stopped counting. I am looking for repetitions and differences.
I use RC and Housecurve. The results between the applications are not the same, especially above 1 kHz, both applications set the low tones similarly. I got the most similar results by holding the microphone vertically upwards.
Supposedly, you should take into account reflections from the entire room around, not just the speakers. But that is not my opinion.
I think RC may be much better than Housecurve, because it sweeps several times and is still being developed, Housecurve has calibration but the measurement is too simple. I do not know how accurate this application is and whether you can trust it.
But for sure after using the correction with RC and Housecurve, the sound is better, but it is slightly different.
 
Even "omnidirectional" mics are not really omnidirectional over the entire frequency range. For that reason most all measuring mics come with separate calibration files for 0⁰ and 90⁰ orientation. If you point the mic to the ceiling but don't use the correct 90⁰ cal file (or no cal file at all), wrong results are guaranteed.

The correct orientation for 2-channel audio is 0⁰ towards the speaker base.
 
I think so too, but I preferred to ask. I made more measurements. I limited the band to 1000 Hz. I improved the results using the cal file. Other settings without changing. Now the results are very similar. The sound is good. I will correct the high tones when RC is more developed (2x20 PEQ and cal files) I wonder whether to reduce 40 Hz to 30 Hz, because my speakers will cope.
 
By the way, I have a question for Dayton microphone users. In some places I read that measuring microphones should be pointed upwards during measurement. How do you do it? Do you point them towards the speakers or upwards?
I pointed the Dayton towards the speakers, but the results are very disappointing: the RC curve lowers all the mid-frequencies and anhances bass and treble a lot, much more than the curve obtained with the phone mic. The result is a very dull sound to my ears, with human voice very distant and some instruments that literally disapper from the scene. I'll try again pointing the Dayton to the ceiling, thanks for the hint.
 
I pointed the Dayton towards the speakers, but the results are very disappointing: the RC curve lowers all the mid-frequencies and anhances bass and treble a lot, much more than the curve obtained with the phone mic. The result is a very dull sound to my ears, with human voice very distant and some instruments that literally disapper from the scene. I'll try again pointing the Dayton to the ceiling, thanks for the hint.
That will increase the "highs" even more?

What frequency range are you trying to correct?
 
The experiment looks good for now after lowering the lower range to 30 Hz. I reduced the gain at 30 and 34 Hz, because RC raised it a lot. I'm worried about the amplifier load and distortion. Before the change I had a drop of -1 dB at 41 Hz, now -1 dB at 28 Hz (from the B&K target curve line). I don't know if it's a good idea, I'll observe.

In reference to @faustocat: I'm now pointing the Daytona towards the speakers. It sounds good to me.
 
Last edited:
I pointed the Dayton towards the speakers, but the results are very disappointing: the RC curve lowers all the mid-frequencies and anhances bass and treble a lot, much more than the curve obtained with the phone mic. The result is a very dull sound to my ears, with human voice very distant and some instruments that literally disapper from the scene. I'll try again pointing the Dayton to the ceiling, thanks for the hint.
Please let us know if this helped.
 
Experiments continued.
I used Housecurve with Dayton towards the speakers (for me there is no difference forward or upward).
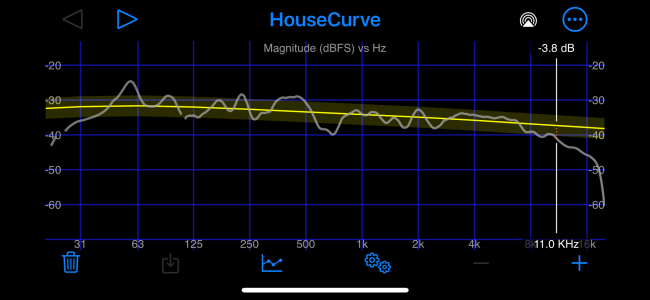
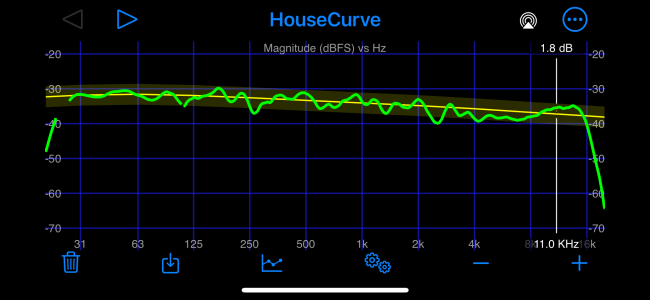
I set the range to 30-8000 Hz. Gain and Q by default, target curve is B&K. Probably the best effect so far, the sound is ok too. I'll paste screenshots without and after correction.
In REW I calculated headroom 5.7 dB. 5.7/0.6=9.5. So Volume Limit reduced by 10%. End of work for today. Now just listen.
What do you think?

IMG_0627.PNG
Before

IMG_0626.PNG
After correction
 
Last edited:
If you are serious about room correction and measurement, you will soon discover there are way better techniques than a making a singles sweep with mic in one position. You dont even need to buy HouseCurve (one alternative on Android is AdioTools) - REW is free software on Windows and Mac.
 
Back
Top