
I bought the WiimPro Airplay 2 specifically for streaming audio from my NAS (networked attached drive) that I use for streaming from my Cambridge Audio server. I use the Cambridge unit with my main system, and it found my NAS drive attached no problem. However, I cannot seem to figure out how to find it with the Wiim software via wifi, although it finds another media server I have but cannot connect to it. In my research, other users were able to connect, (they said the unit found attached network drives) which is why I bought this unit. Can anyone help? Give me a step but step, if it is indeed possible? (I hope so). I hope I didn't waste my money. Thank you in advance.
You are using an out of date browser. It may not display this or other websites correctly.
You should upgrade or use an alternative browser.
You should upgrade or use an alternative browser.
Wiim Pro Airplay 2 NAS (network attached drives) Capabilities?
- Thread starter Starsick
- Start date
Are you comfortable installing an OS on the Pi, something like Raspberry Pi OS Lite?
That's probably the easiest with the best documentation.
If you're using the WiiM app you won't need to worry about what protocol it's using (e.g. Airplay) as it will handle that for you.
That's probably the easiest with the best documentation.
If you're using the WiiM app you won't need to worry about what protocol it's using (e.g. Airplay) as it will handle that for you.

Brantome
Major Contributor
- Joined
- Oct 20, 2022
- Messages
- 6,842
It’s most commonly referred to on the forum simply as the WiiM Pro , AirPlay 2 being just one of the protocols supported in the remainder of the product descriptionI understand. This is the device, which is why I am referring to it in the manner I am. View attachment 2756
")
I have a Pi 4 8 GB on the way here, with a 512 GB SD card to host the OS and for file indexing. I'll use the Pi 2 for something else that may require less intensive processing power.Yes but a 3 or 4 will be better.
If you run LMS you will find yourself using Material for most things and WHA for Amazon only and setup
Gotcha. Thank you.It’s most commonly referred to on the forum simply as the WiiM Pro , AirPlay 2 being just one of the protocols supported in the remainder of the product description
Ok, so you don't want to do the install right now?I have a Pi 4 8 GB on the way here, with a 512 GB SD card to host the OS and for file indexing. I'll use the Pi 2 for something else that may require less intensive processing power.
The reason I ask is because the Pi 2 would require a 32 bit install whereas you could go 64 bit with the Pi 4. I just want to make sure I don't give you incorrect instructions.
Is that SD card just for the OS and server software, not for the music itself?
Last edited:
This should work:
## Install the OS
Follow this guide to install Raspberry Pi OS Lite (32-bit or 64-bit)

# ssh into the Pi and make sure the OS is up to date
$ sudo apt update
$ sudo apt upgrade
## Mount the remote NAS Share
# If you don't know the NAS Share name, list all the shares on the server
$ sudo apt install smbclient
$ smbclient --no-pass --list <server-ip>
# Install the cifs package (this is a suggested package of smbclient so may not be necessary if you installed it above)
$ sudo apt install cifs-utils
# Make a directory to hold the mounted NAS Share
$ sudo mkdir /mnt/music
# Mount the filesystem temporarily to check connection details
$ sudo mount -t cifs //<server-ip>/<server-share> /mnt/music
# NOTE: If you have to authenticate to the NAS share append the following details to the above command
-o username=<share_user>,password=<share_password>
# Check it worked
$ ls -l /mnt/music
# If it worked, unmount the share and configure for mounting at boot time
$ sudo umount /mnt/music
# Add the cifs mount to the bottom of the fstab file (replace vi with your editor of choice e.g. nano)
$ sudo vi /etc/fstab
//<server-ip>/<server-share> /mnt/music cifs user=<share_user>,pass=<share_password>,iocharset=utf8 0 0
# NOTE: Remove the "user=xx,pass=xx," if the share isn't authenticated
# Verify the fstab changes
$ sudo mount -fav
# Assuming the test proved "successfully mounted" mount the share
$ sudo mount -a
## Install MinimServer and dependencies
# Once you have the remote share mounted follow the instructions here (they look daunting but they're really not).
 minimserver.com
# NOTE: Make sure to install the package for the architecture (32-bit or 64-bit) chosen during the OS installation.
minimserver.com
# NOTE: Make sure to install the package for the architecture (32-bit or 64-bit) chosen during the OS installation.
# At this point you should be able to see the MinimServer configuration web interface on http://<server-ip>:9790, or via MinimWatch if you installed it using the previous instructions. This is where you perform library rescans, but it can also be done in control point apps like BubbleUPnP.
Any problems let me know.
## Install the OS
Follow this guide to install Raspberry Pi OS Lite (32-bit or 64-bit)
A Beginner’s Guide to Installing Raspberry Pi OS
A beginners guide to installing an Operating System to your Raspberry Pi.
howtohifi.com
# ssh into the Pi and make sure the OS is up to date
$ sudo apt update
$ sudo apt upgrade
## Mount the remote NAS Share
# If you don't know the NAS Share name, list all the shares on the server
$ sudo apt install smbclient
$ smbclient --no-pass --list <server-ip>
# Install the cifs package (this is a suggested package of smbclient so may not be necessary if you installed it above)
$ sudo apt install cifs-utils
# Make a directory to hold the mounted NAS Share
$ sudo mkdir /mnt/music
# Mount the filesystem temporarily to check connection details
$ sudo mount -t cifs //<server-ip>/<server-share> /mnt/music
# NOTE: If you have to authenticate to the NAS share append the following details to the above command
-o username=<share_user>,password=<share_password>
# Check it worked
$ ls -l /mnt/music
# If it worked, unmount the share and configure for mounting at boot time
$ sudo umount /mnt/music
# Add the cifs mount to the bottom of the fstab file (replace vi with your editor of choice e.g. nano)
$ sudo vi /etc/fstab
//<server-ip>/<server-share> /mnt/music cifs user=<share_user>,pass=<share_password>,iocharset=utf8 0 0
# NOTE: Remove the "user=xx,pass=xx," if the share isn't authenticated
# Verify the fstab changes
$ sudo mount -fav
# Assuming the test proved "successfully mounted" mount the share
$ sudo mount -a
## Install MinimServer and dependencies
# Once you have the remote share mounted follow the instructions here (they look daunting but they're really not).
Installing MinimServer 2 on the Raspberry Pi
# At this point you should be able to see the MinimServer configuration web interface on http://<server-ip>:9790, or via MinimWatch if you installed it using the previous instructions. This is where you perform library rescans, but it can also be done in control point apps like BubbleUPnP.
Any problems let me know.
The pi 4 is what I am going to use, and the 512 GB SD Card is for OS and indexing only. THANK YOU so MUCH!Ok, so you don't want to do the install right now?
The reason I ask is because the Pi 2 would require a 32 bit install whereas you could go 64 bit with the Pi 4. I just want to make sure I don't give you incorrect instructions.
Is that SD card just for the OS and server software, not for the music itself?
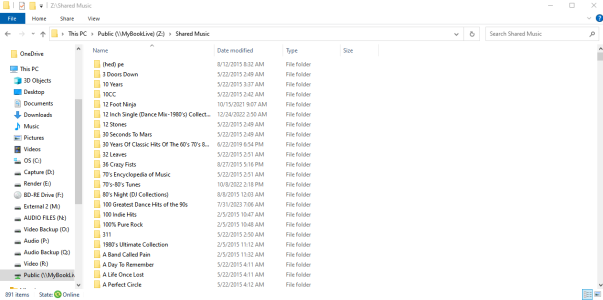
SO SUPER COOL!! One question (I use Windows) Here is the location of the networked share according to Windows - what would the command line be in Linux for the network share mount? PNG Attached.This should work:
## Install the OS
Follow this guide to install Raspberry Pi OS Lite (32-bit or 64-bit)
A Beginner’s Guide to Installing Raspberry Pi OS
A beginners guide to installing an Operating System to your Raspberry Pi.howtohifi.com
# ssh into the Pi and make sure the OS is up to date
$ sudo apt update
$ sudo apt upgrade
## Mount the remote NAS Share
# If you don't know the NAS Share name, list all the shares on the server
$ sudo apt install smbclient
$ smbclient --no-pass --list <server-ip>
# Install the cifs package (this is a suggested package of smbclient so may not be necessary if you installed it above)
$ sudo apt install cifs-utils
# Make a directory to hold the mounted NAS Share
$ sudo mkdir /mnt/music
# Mount the filesystem temporarily to check connection details
$ sudo mount -t cifs //<server-ip>/<server-share> /mnt/music
# NOTE: If you have to authenticate to the NAS share append the following details to the above command
-o username=<share_user>,password=<share_password>
# Check it worked
$ ls -l /mnt/music
# If it worked, unmount the share and configure for mounting at boot time
$ sudo umount /mnt/music
# Add the cifs mount to the bottom of the fstab file (replace vi with your editor of choice e.g. nano)
$ sudo vi /etc/fstab
//<server-ip>/<server-share> /mnt/music cifs user=<share_user>,pass=<share_password>,iocharset=utf8 0 0
# NOTE: Remove the "user=xx,pass=xx," if the share isn't authenticated
# Verify the fstab changes
$ sudo mount -fav
# Assuming the test proved "successfully mounted" mount the share
$ sudo mount -a
## Install MinimServer and dependencies
# Once you have the remote share mounted follow the instructions here (they look daunting but they're really not).
# NOTE: Make sure to install the package for the architecture (32-bit or 64-bit) chosen during the OS installation.Installing MinimServer 2 on the Raspberry Pi
# At this point you should be able to see the MinimServer configuration web interface on http://<server-ip>:9790, or via MinimWatch if you installed it using the previous instructions. This is where you perform library rescans, but it can also be done in control point apps like BubbleUPnP.
Any problems let me know.
Attachments
512gb is way bigger than necessary. 32gb is more than sufficientThe pi 4 is what I am going to use, and the 512 GB SD Card is for OS and indexing only. THANK YOU so MUCH!
If you are installing Pi OS you mount the NAS drive through fstab
The Pi will need write access
As long as the Pi can resolve //MyBookLive (try with 'ping MyBookLive' on the Pi) then:SO SUPER COOL!! One question (I use Windows) Here is the location of the networked share according to Windows - what would the command line be in Linux for the network share mount? PNG Attached.
Code:
sudo mount -t cifs '//MyBookLive/Shared Music' /mnt/music
Code:
//MyBookLive/Shared\040Music /mnt/music cifs iocharset=utf8 0 0But go through it step by step if you're not sure.
I'm assuming there's no authentication on the share.
Last edited:
I don't know if it's still the case, but the bigger problem with having an SD card this size is if you want to back it up. I think you can shrink it afterwards but it still has to copy the WHOLE card doesn't it?512gb is way bigger than necessary. 32gb is more than sufficient
Why would the Pi need write access to the NAS?If you are installing Pi OS you mount the NAS drive through fstab
The Pi will need write access
Playlists?I don't know if it's still the case, but the bigger problem with having an SD card this size is if you want to back it up. I think you can shrink it afterwards but it still has to copy the WHOLE card doesn't it?
Why would the Pi need write access to the NAS?
I don't think the UPnP spec supports writing playlists (via the media server), I certainly don't know of any control points that do, they're usually stored on the phone.Playlists?
I understand, I am unsure what you mean "spaces in the share name will have to be replaced with \ 040 in fstab", because obviously I don't know what I'm doing here. But your tutelage is appreciated mor than you knowAs long as the Pi can resolve //MyBookLive (try with 'ping MyBookLive' on the Pi) then:
will map it temporarily, and in fstab you'll need:Code:sudo mount -t cifs '//MyBookLive/Shared Music' /mnt/music
NOTE: Spaces in the share name have to be replaced with \040 in fstab.Code://MyBookLive/Shared\040Music /mnt/music cifs iocharset=utf8 0 0
But go through it step by step if you're not sure.
I'm assuming there's no authentication on the share.
 and yes, no authentication is needed.
Spaces are delimiters that separate the arguments passed to commands.I understand, I am unsure what you mean "spaces in the share name will have to be replaced with \ 040 in fstab", because obviously I don't know what I'm doing here. But your tutelage is appreciated mor than you know
mount -t cifs //MyBookLive/Shared Music /mnt/music
If we take the mount command as an example, it expects to be passed the remote share name followed by the local mount location (where you want to view the remote library on your local filesystem). Without quoting the remote share, mount would think //MyBookLive/Shared is the remote share, you'd like it to be mounted to Music and /mnt/music is an additional parameter that it doesn't know what to do with. To address this we quote the remote share so it's understood as a single parameter.
mount -t cifs '//MyBookLive/Shared Music' /mnt/music
When defining these mappings in fstab (so it's mounted at boot time) it's not possible to use quotes, so you instead need to replace the space in //MyBookLive/Shared Music with '\040' so it becomes //MyBookLive/Shared\040Music and is understood as a single parameter.
SUPERB - I know nothing of Linux so this is extremely helpful!!!!!Spaces are delimiters that separate the arguments passed to commands.
mount -t cifs //MyBookLive/Shared Music /mnt/music
If we take the mount command as an example, it expects to be passed the remote share name followed by the local mount location (where you want to view the remote library on your local filesystem). Without quoting the remote share, mount would think //MyBookLive/Shared is the remote share, you'd like it to be mounted to Music and /mnt/music is an additional parameter that it doesn't know what to do with. To address this we quote the remote share so it's understood as a single parameter.
mount -t cifs '//MyBookLive/Shared Music' /mnt/music
When defining these mappings in fstab (so it's mounted at boot time) it's not possible to use quotes, so you instead need to replace the space in //MyBookLive/Shared Music with '\040' so it becomes //MyBookLive/Shared\040Music and is understood as a single parameter.
If you know absolutely nothing you may be better off with piCorePlayer and LMS - all set up and config is via a browserSUPERB - I know nothing of Linux so this is extremely helpful!!!!!
I understand. From what I have gleamed from this thread, I cannot use LMS in the WiiM app of play through the WiiM. I don't want to go that route.If you know absolutely nothing you may be better off with piCorePlayer and LMS - all set up and config is via a browser
Similar threads
- Replies
- 3
- Views
- 985
- Replies
- 4
- Views
- 882
- Replies
- 11
- Views
- 835
D
- Question
- Replies
- 19
- Views
- 2K
- Replies
- 33
- Views
- 3K